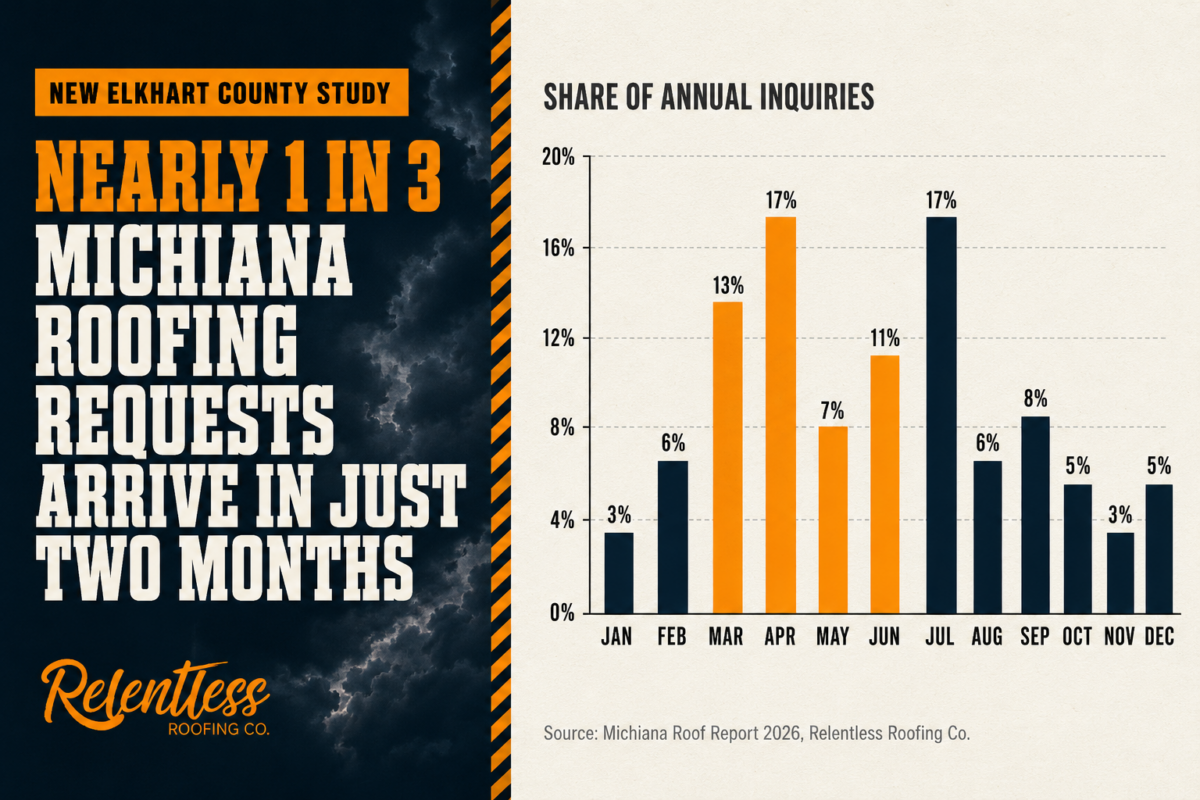
A roofing inspection checklist helps homeowners find roof problems early, prevent leaks, and plan repairs before costs rise. A strong checklist covers roof surfaces, flashing, gutters, attic warning signs, ventilation, and safe inspection limits. It should also help you decide what needs urgent action, what can wait, and when to call a professional roofer.
Introduction
Many roof problems begin small. A loose shingle, light stain on the ceiling, or clogged gutter may seem minor at first. Left alone, that same issue can lead to water damage, mould, rotten wood, damaged insulation, or expensive repairs.
That is why a roofing inspection checklist matters. It gives you a clear system to inspect your roof instead of relying on guesswork. You know what to check, where to look, and what warning signs deserve attention.
This guide is built for homeowners. It explains what you can inspect safely, what certain problems often mean, and when it makes sense to call a roofing contractor. Think of it as a smart decision tool, not just a checklist.
What Is a Roofing Inspection Checklist and Why It Matters for Every Home
A roofing inspection checklist is a step-by-step guide used to review the condition of your roof and the parts that protect your home from water. It helps you inspect visible areas, drainage systems, flashing, attic spaces, and signs of hidden moisture in a logical order.
Without a checklist, many homeowners only look at the roof when a leak starts. By then, water may already be inside the roof deck, underlayment, insulation, or ceiling. Early checks often turn a major repair into a small fix, and knowing what to check after roofers install a new roof gives you a baseline to compare against during future inspections.
A useful checklist should include:
- Roof surface condition
- Missing shingles or cracked tiles
- Rust on metal roof panels
- Flashing around chimneys, skylights, and vents
- Gutters and downspouts
- Ceiling stains and attic moisture
- Ventilation issues
- Sagging or structural movement
The biggest benefit is clarity. You can separate normal wear from signs of damage that need quick action.
Why Regular Roof Inspections Help Prevent Expensive Repairs
Regular roof inspections help because roofs usually fail slowly before they fail badly. A small crack in flashing or sealant may let in water for months without obvious signs. Wet wood weakens over time. Insulation loses performance. Paint peels. Then the repair bill grows.
Many people wait until they see a leak indoors. That delay often costs more. A visible leak can mean water has already moved through shingles, underlayment, decking, or attic areas.
Routine checks can also extend the life of your roof. Asphalt shingles, flashing, vents, gutters, and metal roof systems often last longer when small issues are fixed early.
If your roof is over 10 years old, yearly checks are wise, and knowing when your roof was last replaced helps you decide how often those checks should happen. If storms, hail, or strong wind hit your area, inspect sooner.
Roofing Inspection Checklist: Exterior Areas to Check
A careful exterior check can reveal many roof issues before they affect the inside of your home. Start from the ground first. That gives you a safer view and helps you notice visible damage before deciding if closer inspection is needed.
Step 1: Ground-Level Roof Inspection — What to Look For Safely
Walk around the property and view the roof from several angles. Good daylight makes this easier.
Look for:
- Missing shingles
- Curling or lifted shingle edges
- Dark worn patches
- Sagging roof lines
- Debris in valleys
- Overflow marks near gutters
- Moss or algae growth
- Bent or loose trim pieces
Risk guide:
- One damaged shingle = Low to moderate
- Several damaged areas = High
- Visible sagging = Urgent
- Overflow and stains = Drainage issue
Binoculars are useful and safer than climbing.
Step 2: Roof Surface Inspection for Shingles, Metal Roof, and Roofing Material
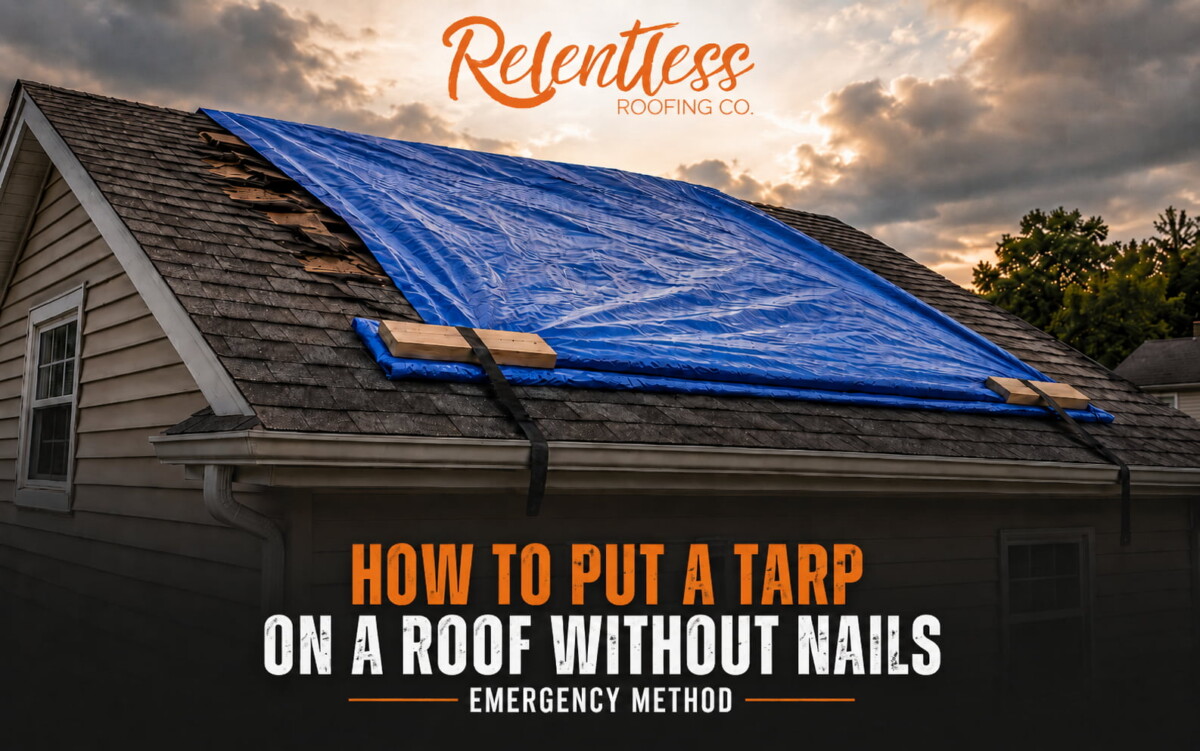
Close-up inspection reveals damage that cannot always be seen from below. This is best handled by trained roofers, especially on steep, wet, or aging roofs. Using a drone for roof inspections has become a safer alternative to climbing for many homeowners.
For asphalt shingles, check for granule loss, cracks, torn tabs, exposed nails, and soft spots. Granules protect shingles from sunlight. Once they wear away, aging speeds up.
For metal roof systems, inspect for rust, loose screws, lifted seams, or failed washers.
For tile roofs, check for cracks, slips, and broken corners.
Soft areas underfoot may point to moisture damage in the roof deck. That should be checked quickly.
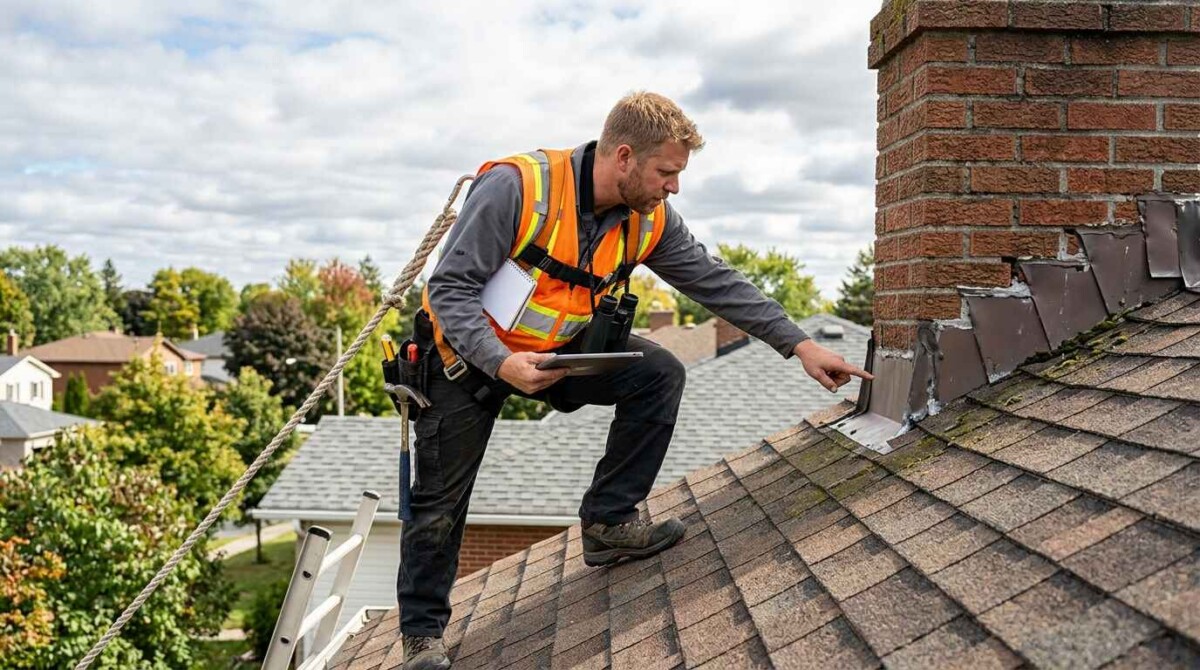
Step 3: Check Flashing Around Chimneys, Skylights, Vents, and Roof Penetrations
Flashing is the metal material used to seal roof joints and openings. It helps stop water from entering weak points where materials meet.
Inspect flashing around:
- Chimneys
- Skylights
- Plumbing vents
- Roof vents
- Wall intersections
- Dormers
Look for rust, cracks, gaps, missing sealant, lifted edges, or loose sections.
Many roof leaks blamed on shingles are actually caused by failed flashing. A small opening can let in water during wind-driven rain.
How Gutters and Downspouts Protect Your Roof and Home
Gutters and downspouts do more than move rainwater. They protect the roof edge, fascia boards, siding, foundation, and landscaping by directing water away from the house.
When gutters clog, water can back up under shingles or spill over the sides. That can lead to rot, stains, erosion, and basement moisture.
Check for:
- Leaves and debris
- Loose brackets
- Rust holes
- Standing water
- Sagging gutter runs
- Downspouts ending too close to the house
- Joint leaks
Tiger-striping on fascia boards often signals dirty overflow water. Soil washout below downspouts can signal poor drainage paths.
Clean gutters several times a year, especially after storms or leaf season.
Roofing Inspection Checklist: Interior Signs of Roof Damage to Check Inside Your Home
Some roof problems appear inside the home before they are obvious outside. That makes interior checks a smart part of any roofing inspection checklist.
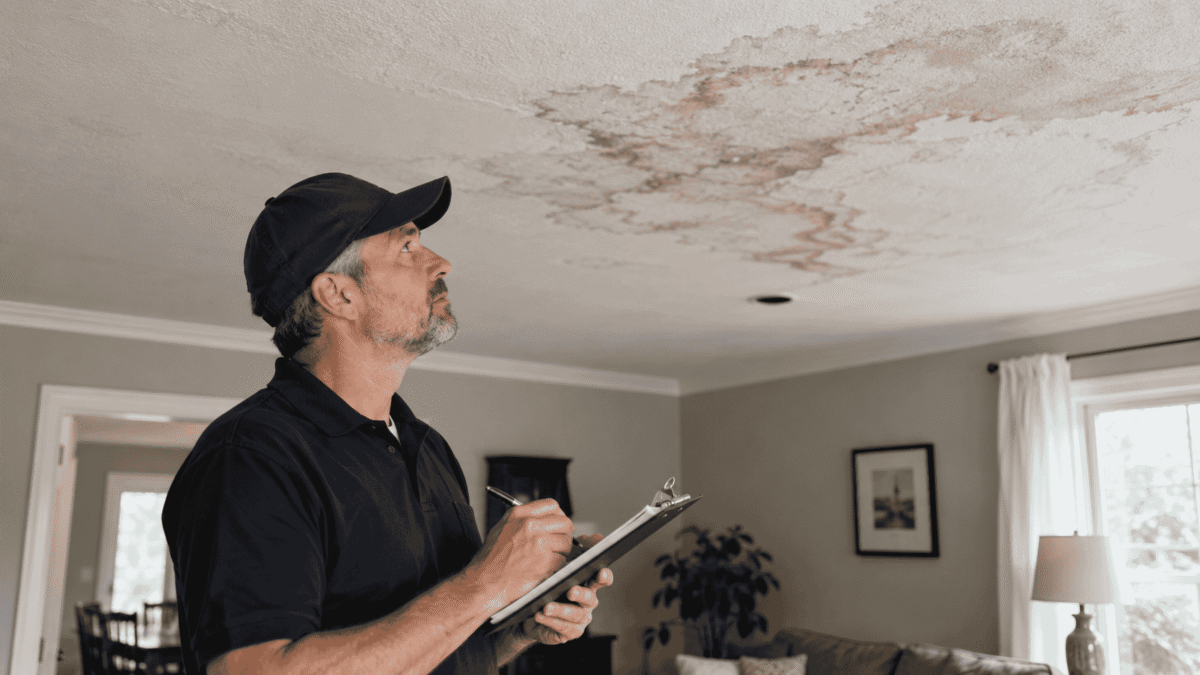
Ceiling Stains and Water Marks
Brown or yellow rings on ceilings often point to moisture above. The stain location may not match the leak source because water can travel along wood framing before dripping.
Attic Leaks and Moisture Build-Up
Inspect attic insulation for damp spots, flattening, mould smell, or dark marks on wood. Wet insulation loses its ability to control heat.
Poor Ventilation and Heat Damage
A hot attic with trapped air can shorten shingle life. Excess heat and moisture can age roofing material faster and encourage mould growth.
Daylight, Mold, and Structural Warning Signs
If daylight comes through roof boards, water can also enter. Look for mould on rafters, sagging wood, or dark staining.
A small ceiling stain may signal a much larger hidden problem above it.
How Often Should You Inspect Your Roof? Best Schedule by Age, Material, and Weather
Most roofs should be inspected once or twice each year. Older roofs, storm-prone areas, and complex roof designs often need more attention.
| Roof Type / Age | Suggested Schedule |
| New roof under 5 years | Once yearly |
| Roof 5–15 years old | Twice yearly |
| Roof 15+ years old | Twice yearly + after storms |
| Metal roof | Yearly + fastener check |
| Hail or wind zones | After major weather events |
Also inspect:
- Before winter
- After heavy rain seasons
- Before selling a home
- After tree branch impact
- If you notice indoor stains
Regular timing prevents long periods of hidden damage.
DIY Roof Inspection vs Professional Roof Inspection: What Homeowners Can Safely Check
Homeowners can handle many visual checks safely. A professional roof inspection goes deeper and can uncover hidden damage.
| DIY Checks | Professional Checks |
| Ground-level visual scan | Walking steep roofs safely |
| Gutter condition check | Moisture testing |
| Ceiling stain review | Leak tracing |
| Attic visual review | Structural assessment |
| Photo notes | Full written inspection report |
Call a professional when:
- You see active leaks
- Roof is steep or hard to access
- Storm damage is likely
- Roof is older and unknown
- You plan to buy or sell a home
- You suspect hidden water damage
A roofing contractor often spots patterns homeowners miss.
When to Call a Professional Roofer Immediately
Some roof problems should never wait. Delaying repairs can lead to water damage, mould growth, insulation issues, and higher structural repair costs. Fast action often limits the damage and reduces the final repair bill.
Call a professional roofer quickly if water is dripping indoors, roof sections look sagged, or large areas of shingles are missing. You should also act fast after tree impact, heavy debris strikes, or bent flashing following a storm, as these problems can expose the roof to leaks.
Other urgent warning signs include a strong mould smell in attic areas, daylight showing through roof boards, repeated leaks in the same room, or major gutter pull-away from the fascia. These issues often point to hidden moisture damage or weakened roof parts.
When you speak with a contractor, ask for photos, clear findings, and repair options. A detailed inspection helps you understand the problem, compare solutions, and make the right decision quickly.
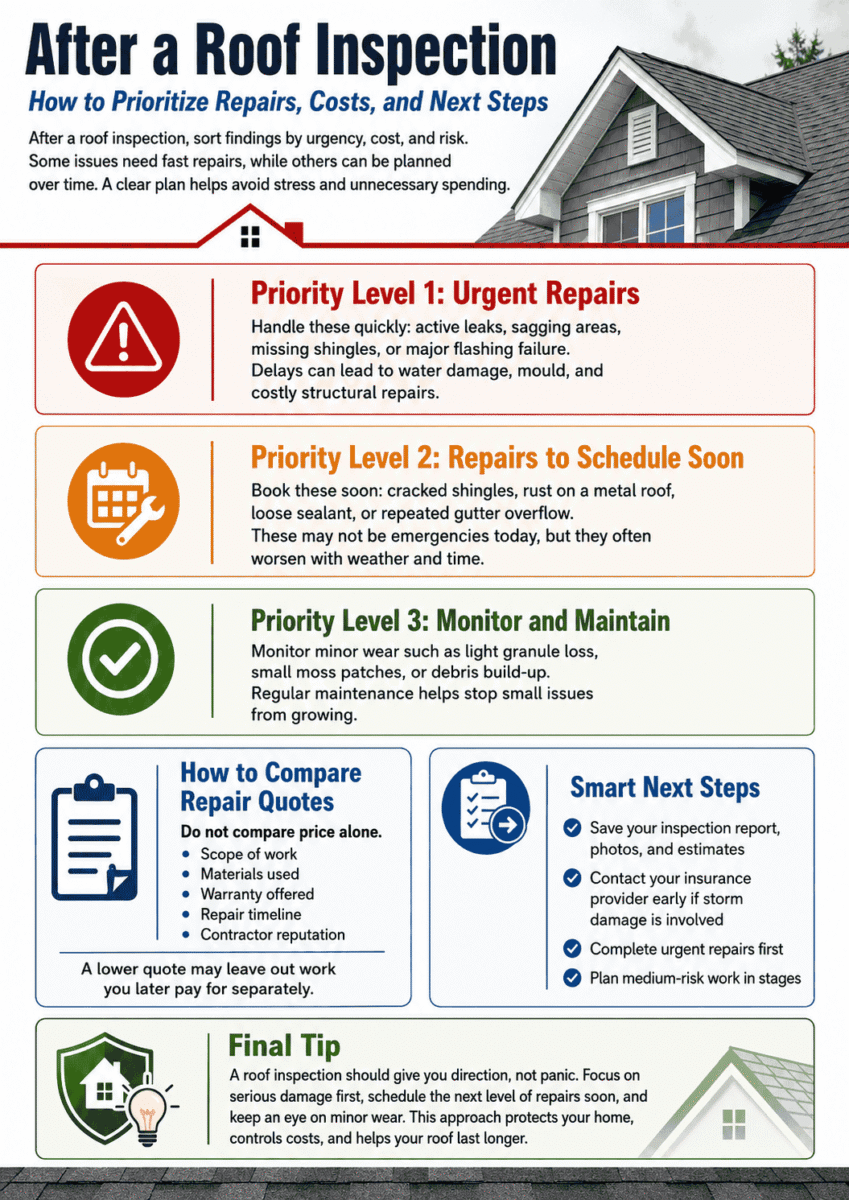
After a Roof Inspection: How to Prioritize Repairs, Costs, and Next Steps
After a roof inspection, the best move is to sort findings by urgency, cost, and risk. Some roof issues need fast repairs, while others can be planned over time. A clear plan helps you avoid stress and unnecessary spending.
Priority Level 1: Urgent Repairs
Active leaks, sagging areas, missing shingles, or major flashing failure should be handled quickly. These problems can lead to water damage, mould, and costly structural repairs if delayed.
Priority Level 2: Repairs to Schedule Soon
Cracked shingles, rust on a metal roof, loose sealant, or repeated gutter overflow should be booked soon. They may not be emergencies today, but they often worsen with weather and time.
Priority Level 3: Monitor and Maintain
Minor wear such as light granule loss, small moss patches, or debris build-up can often be monitored. Regular roof maintenance helps stop these small issues from growing.
How to Compare Repair Quotes
Do not compare price alone. Review the scope of work, materials used, warranty offered, repair timeline, and contractor reputation. A lower quote may exclude key work that you later pay for separately.
Smart Next Steps
Save your roof inspection report, photos, and estimates. If storm damage is involved, contact your insurance provider early. Complete urgent repairs first, then plan medium-risk work in stages.
Final Tip
A roof inspection should give you direction, not panic. Focus on serious damage first, schedule the next level of repairs soon, and keep an eye on minor wear. This simple approach protects your home, controls costs, and helps your roof last longer.
Common Roof Inspection Mistakes Homeowners Make
Many expensive roof problems start with small mistakes during inspection or basic maintenance. Early warning signs are often easy to miss, but delaying action can turn a simple repair into major damage.
- Waiting for a leak before checking the roof
- Ignoring the attic and ceilings
- Walking on unsafe roofs
- Assuming small stains are harmless
- Forgetting gutters and downspouts
- Delaying minor repairs
- Failing to take photos
- Hiring only by lowest price
- Ignoring storm checks
One missed issue can stay hidden for months and grow into a much bigger repair.
Key Takeaway
- A roofing inspection checklist helps catch small issues early.
- Exterior, attic, and drainage checks all matter.
- Not every sign is urgent, but some need fast action.
- Use a simple system: Urgent, Soon, Monitor.
- Homeowners can do safe visual checks from the ground and attic.
- Professional inspections offer better detail and safer access.
- Roofs older than 10 years deserve regular review.
- After storms, inspect as soon as conditions are safe.
Conclusion
Your roof protects the structure, contents, and comfort of your home. Waiting until a leak appears is one of the most expensive ways to manage it. A clear roofing inspection checklist gives you a better plan.
Use regular checks as routine home care. Start with safe visual reviews, document what you find, and act early when warning signs appear.
When damage looks serious or uncertain, call a trusted roofing contractor. Small action now often prevents major repair costs later.
You May Also Want to Read
You may also want to read:
- What Happens During a Commercial Roof Inspection
https://relentlessroofingco.com/what-happens-during-a-commercial-roof-inspection/ - How Long Does a Typical Commercial Roof Inspection Take
https://relentlessroofingco.com/how-long-does-a-typical-commercial-roof-inspection-take/
FAQs
How often should I use a roofing inspection checklist?
Use a roofing inspection checklist at least once a year. Older or regular roof systems should be checked twice yearly as part of proactive maintenance. You should also inspect after hail, wind, heavy rain, or falling debris. Regular inspections help spot signs of wear before they shorten roof lifespan.
Can I inspect my roof without climbing onto it?
Yes. A ground-level exterior inspection, binocular views, attic checks, ceiling stain checks, and gutter reviews can reveal many potential issues. Look for signs of damage, signs of water, or blocked drainage. Leave steep roofs, roof penetrations, and close-up checks to a roofer with appropriate safety equipment.
What are the first signs of roof damage?
Common early signs include missing shingles, curl at shingle edges, granule loss, water stains, mould smell, clogged gutters, rusted flashing, and sagging roof lines. You may also notice signs of water damage near ceilings, skylight edges, or seals around vents that are no longer properly sealed.
Is a professional roof inspection worth the cost?
Yes. A thorough roof inspection can uncover hidden water intrusion, roof deck weakness, ventilation issues, and other potential problems that are easy to miss. It can also provide photo evidence and help prevent larger repair bills later. It is especially useful for older roofs and storm damage.
Should I inspect my roof after a storm?
Yes. Storms can loosen shingles, bend flashing, clog gutters, and damage roofing material. They can also open small gaps around a penetration point or move seals around vents and chimneys. Even minor weather events can create hidden damage that is not visible right away.
Can a roof inspection help with insurance claims?
Yes. Dated photos, written findings, and a clear inspection report can support storm damage claims and explain the condition of the roof. A free roof inspection checklist can help you record signs of damage early, but a professional report often carries more weight during claims review.